Introduction
Calculators are the main type of tools within CalcKit. They are very easy to build and represent the largest portion of tools in CalcKit
Below I’ll try to explain all components of the calculators and how to build them, with some examples.
To create a new calculator, open the My Tools folder, click the ⋮ and then click Create New Calculator
Components
Each calculator is built using multiple required and optional components.
Icon Title Category Tags Header Footer Image Image Description Options Variables
The only required components are Icon, Title and Variables.
Icon / Title / Category / Tags
![]()
The Title and the Icon are self-explanatory.
The Icon can be changed by simply clicking on it. After you click it, a window will pop-up where you’ll see a list with pre-made icons to choose from and also a field where you can type URL to your own icon.
The Category could be useful when you add multiple calculators from different branches in the same folder and you want to know to which branche each of them belongs. Take for example our Library. There are over one-hundred calculators in it, for mathematics, electronics, converters and so on. To find all electronics calculators you would, for example, type Electronics in the Search Bar and only the electronics tools will be displayed.
The Tags (separated by space) are also used for searching, but (unlike the Title and Category) they are not visible to the user. Using a correct combination of tags you can create some very nice search queries. For example, in the Length converter we have added the units km m cm etc. in the tags and we’ve also included the word to. Now, when you open the Library and search for km to cm the Length converter will be right there on top.
Header / Footer
The Header is a text box displayed on the top of your calculator, above the image and variables.
The Footer is a text box displayed on the bottom of your calculator, below the variables.
Both Header and Footer are optional fields. If you leave them empty, they will automatically be hidden in your calcualator.
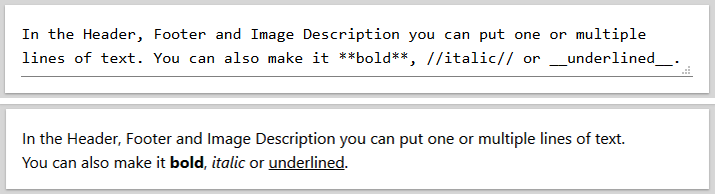
Both fields can contain one or multiple lines of text.
You can also apply some basic styling on the text (as you can see on the image above) making portions of it **bold**, //italic// or __underlined__, or also mixing them **//__together__//**.
Image / Image Description
CalcKit gives you the possibility to insert an Image in your calculator.
If included, the Image is displayed between the Header and the Variables.
Because we do not host/store user files on our servers, you’ll need to upload the Image somewhere else (Imgur / PostImage) and only type the URL pointing to the image.
As you might know, CalcKit has two themes, light and dark, so if you are using a transparent image, you might want to include two versions of it. You can do that by filling the two fields: Image URL Dark for the dark theme and Image URL Light for the light theme.
If you fill only one of the URL fields, the same image will be displayed on both themes. If you leave both fields empty, the image box will be automatically hidden in your calculator.
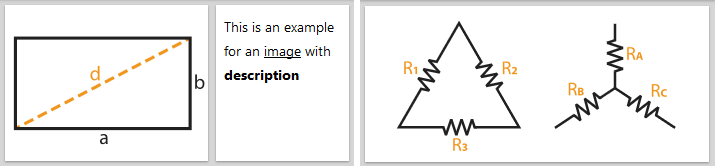
Together with the Image, you can add an Image Description as well.
Same as the Header and Footer, the Image Description can have one or multiple lines of text and you can also apply the same text styling that is available for the Header and Footer (**bold** //italic// __underlined__).
Note: If you do not include an image, the image description will be automatically hidden, regardless of what you have written in it.
If you include an image, but you leave the image description field empty, the image will take the full width of the page (see picture right). Otherwise, if you write something in the image desciption, the image and it’s description will be displayed in the same line, with the image taking around 60% and the description around 40% of the page width (see picture left).
Variables

The Calculators can contain any number of Variables, with each Variable having four elements: Identifier, Name, Equations and Unit(s).
All Calculators in CalcKit use a unique Circular Reference Algorithm, which allows each Variable to act as both Input and Output.
Identifier
The Identifier is basically a unique name/word that you’ll use to reference this variable in other variables’ equations.
It must begin with a letter a-z A-Z or underscore _.
It can contain letters a-z A-Z, numbers 0-9 and underscores _.
Name
The Name is a Label for the variable that you see on-screen when you use the Calculator.
Equations
Each variable can have any number of equations. It might also have 0 equations in which case the variable is considered to be an input.
In the Equations field you can put as many equations as you need to. Each equation needs to be put on a new row.
For example, in the Length Converter you’ll find the following equations for the Meter variable:
_mm * 0.001
_cm * 0.01
_km * 1000
_in * 0.0254
_ft * 0.3048
_mi * 1609.344
where _mm, _cm, _km, _in, _ft and _mi are the Identifiers for Millimeter, Centimeter, Kilometer, Feet and Mile respectively.
Unit(s)
The Unit appears on the right side of the variable’s input field.
It is not required. You can leave it completely empty, in which case, the input field will expand to the end of the line in the calculator.
You can add a single unit that will be displayed as simple text, or you may add multiple units that will be displayed as dropdown menu when using the calculator.
To add a single unit as text, you just need to type it in the Unit(s) field.
Just make sure to type it on the first line and do not create a second line.
To add a dropdown of multiple units, you need to put each unit on a new row.
You also need to include a multiplier for each unit, so that CalcKit can calculate the value.
Let’s look at our Electricity Cost Calculator. There we have multiple variables that have dropdowns on the right side.
You can see that for the Running time variable, we have the dropdown with units: Minutes, Hours, Days, Weeks etc. To create it we use the following code in the Unit(s) field.
60 Minutes
1 Hours
0.0416666666666667 Days
0.005952380952381 Weeks
Here, the Hours have a multiplier of 1, so Hours is our base unit. That means when you select minutes, internally they are converted to hours and all equations for this variable are using the unit Hours.
To calculate the multiplier for the other units we do the following:
- Minutes: There are 60 minutes in one hour, so the multiplier for minutes is
60 - Days: There are 24 hours in a day, so that is 1/24 days in one hour, which comes to
0.0416666666666667 - Weeks: There are 24*7 hours in a week, so 1/(24*7) weeks in one hour, which is
0.005952380952381
Options

At time of writing this, there are two extra Options that you can Enable for each of your calculators.
Long Variable Names
With this option enabled, each variable will spread on two lines.
The Name of the variable will be put on the first line and will take the full width.
The Input Field and the Unit(s) will be displayed on the second line.
This is useful when you have names for the variables that are longer than 2-3 words.
Unit inside Input
When you have this option enabled, in all variables that have a single text unit, the Unit will be displayed as a placeholder for the input field and the input field will expand to the end of the line.
This option will effect only the variables that have simple text unit, that means variables with multiple units (dropdown) will not be affected and will be displayed same as before enabling this option.